General Overview
Explanation of Android Enterprise
Requirements and Installation
Requirements
General Settings
Account Overview
Account Information
Global Configuration
Privacy
Role Based Access
Apple Configuration
Android Configuration
Windows Configuration
ContentBox
LDAP Configuration
App Management
In-House App DB
App Settings
App Store Settings
Remote Control
Sim Card Management
Subscription Management
General Audit Log
Mobile Management
iOS Configuration
General
Device Log (only on device level)
Asset Management (only on device level)
Asset Management (only on device level)
Security Management
Anti Theft (only on device level)
Security Configuration
End of Life (only on device level)
Restriction Settings
BYOD
Connection Management
Web Management
App Management
Android Enterprise – Fully Managed Device Configuration
General
Device Log (only on device level)
Device Settings
Asset Management (only on device level)
Security Management
Anti Theft (only on device level)
Security Configuration
End of Life (only on device level)
Restriction Settings
Connection Management
PIM Management
App Management
Enterprise App Manager
Restrictions & Settings
Enterprise App Store
Enterprise Play Store
Kiosk Mode & Launcher
Remote Control
Content Management
Additional API
Samsung KNOX
Android Enterprise - Fully Managed Device with-Work Profile (COPE)
Android Enterprise – Container Configuration
General
Asset Management (only on device level)
Security Management
Anti Theft (only on device level)
Security Configuration
End of Life (only on device level)
Restriction Settings
Connection Management
PIM Management
App Management
Enterprise App Manager
Restrictions & Settings
Enterprise App Store
Enterprise Play Store
Content Management
Android Configuration
General
Device Log (only on device level)
Device Settings
Asset Management (only on device level)
Security Management
Anti Theft (only on device level)
Security Configuration
End of Life (only on device level)
Restriction Settings
BYOD Container
Connection Management
PIM Management
App Management
Enterprise App Manager
Restrictions & Settings
Kiosk Mode & Launcher
Remote Control
Content Management
Configuration Windows 10 PC
General
Device Log (only on device level)
Asset Management (only on device level)
Security Management
Anti Theft (only on device level)
Security Configuration
Restriction Settings
BitLocker
Certificate Management
Connection Management
PIM Management
App Management
Enterprise App Manager
MacOS Configuration
General
Asset Management (only on device level)
Update Management (only on device level)
Security Management
Anti Theft
Security Configuration
Restriction Settings
Connection Management
PIM Management
Dashboard & Reporting
Multitenant Management
Additional views
ADE
NOTE: ADE was previously called DEP (Device Enrollment Program) and got recently renamed into ADE. This is just a name change. It is functionally unchanged. Therefore you might sometimes still come across the wording “DEP”. This is interchangeable with “ADE” and all info about DEP is still valid and applies to ADE.
ADE (Automated Device Enrollment) allows you to easily enroll devices into the MDM. When using ADE, the devices will be automatically connected to the MDM when setting up the device. You can also skip almost all of the setup steps which are usually mandatory on iOS.
Another benefit is that devices enrolled via ADE are also automatically running in the supervised mode, offering you full control. Due to that ADE is usually a mandatory topic if you use company owned devices.
To use ADE the devices need to be registered in the Apple Business or School Manager either via a vendor that supports it or manually by using the Apple Configurator on iOS.
Note: for ADE the School and Business Manager are exactly the same. Therefore to increase readability we will only mention School Manager as an example from now on.
More Information about ADE: https://support.apple.com/en-us/102300
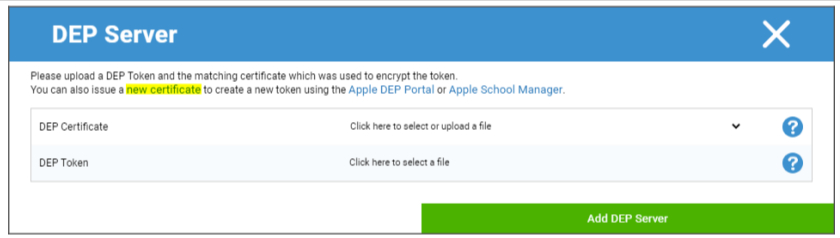
Click on the “+” to add a ADE Token. In the Popup, click on “new certificate” in the text (marked yellow in the image below). This will generate and download a ADE certificate. Afterwards go to the Apple Business Manager (https://business.apple.com/).
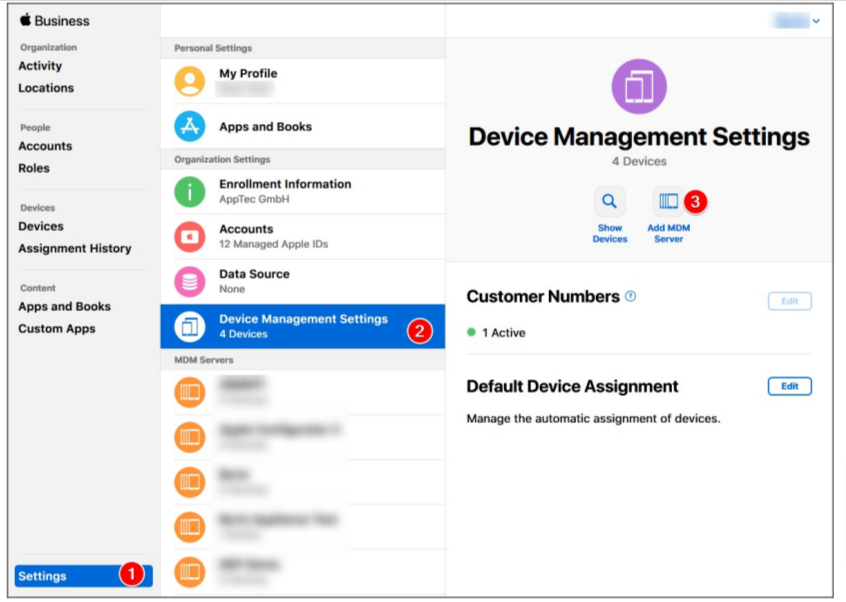
In the Apple Business Manager, follow the steps as shown in the image above. Settings → Device Management Settings → Add MDM Server.
Give the Server any name you want and upload the previously downloaded ADE Certificate under MDM Server Settings → Upload Public Key and click on “Save”.
You will now have the option “Download Token”. Click on this and save it. The Token is only valid for 1 year. But just clicking “Download Token” again, will give you a new one, which makes renewing the token very easy.

You can now go back to the MDM, where you previously downloaded the ADE Certificate. If you did not close the tab, the popup for adding a ADE Server should still be opened and the ADE Certificate should already be selected. You can now upload your Token in the field “ADE Token” and click on ADE Server.
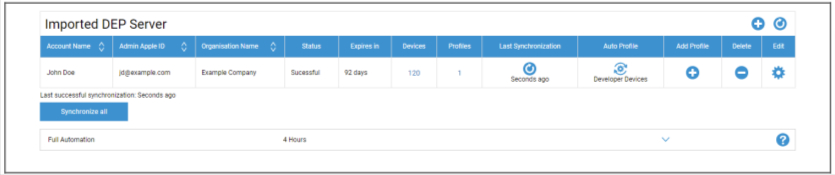
In the column “Devices” you will see the amount of devices that are assigned to this ADE Server. Devices added to this ADE server will be automatically created in the ADE Pool in the Mobile Management.
You can click on this number to get an overview over all your ADE devices and their status.
Note: Depending on your workflow or configuration in the Business Manager it may be possible that you have to manually assign these devices to the ADE Server. You can also set a default ADE Server in the Apple Business Manager for new devices.
In the column “Profiles” you see the Amount of ADE Profiles you have. You can also click on this number to see details about your ADE Profiles and you are able to delete old/unused profiles here. It is currently not possible to change these. If you want to make a change, you have to create a new one.
In the column “Last Synchronization” you can manually sync the ADE Server (e.g. if you just added a new device to ADE) and see the date of the last successful Sync.
In the column “Auto Profile” you can set a ADE profile as an automatic default. This profile will be assigned automatically to new devices. If you do not set an Auto Profile, you have to manually assign a profile to new devices each time.
In the column “Add Profile” you can add a new ADE profile. The device will receive this at the beginning of the device setup. The ADE profile defines how the device is set up and which setup steps will be skipped.
Note: after a device is enrolled, these settings can only be changed by performing a factory reset and enrolling the device with a new profile. This is especially relevant for “Removable” and “Allow pairing”. In case of “Allow pairing” it is recommended to turn this on, since this can be disabled via MDM restrictions, but it cannot be enabled again if its disabled in the ADE profile.
In the column “Edit” you can upload a new token, e.g. when renewing the Token.